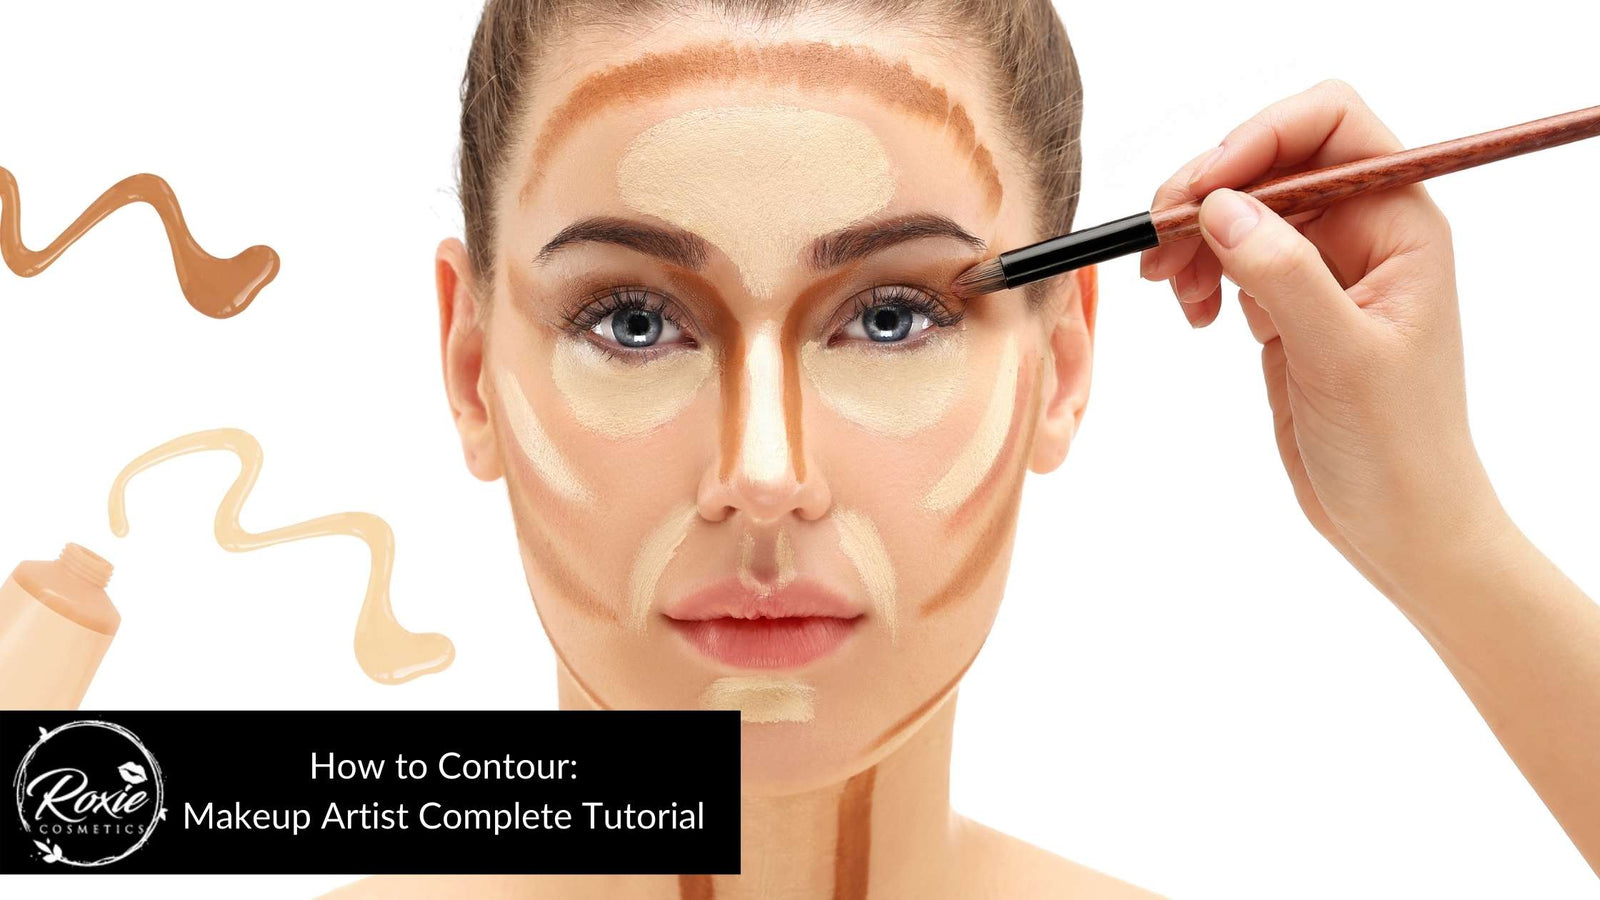
Contouring has been a specialised technique of most makeup artists, from defining cheekbones to sculpting the jawline. It highlights a unique face shape by doing contour makeup. It can make any makeup pop by adding depth and dimension. Contour highlights facial areas and the bone structure of the face. It may first seem like a complex makeup step to master but becomes easy with practice. This beauty technique isn't as complicated as it sounds. This contouring technique is the opposite of highlighting. Highlight means to bring out a feature on the face by adding light shades to a specific spot. Contouring means darkening the side of the face that wants either to be defined or less noticeable. One of the most common sides to contour is the cheeks. Adding a darker colour to this area will create the cheekbones shadows, making them look sharper, higher, and defined.
Finding the right shade for one’s skin complexion is one of the essential things to do. Another vital thing to consider is identifying and understanding the shape of the face one has. Contouring is easy when one knows what one needs to emphasise and what one needs to define. This makeup contouring can highlight the facial features when one puts them right. There are many contours; it can be a cream, liquid, or powder. These product finishes can make a massive difference in the makeup look of one's face, it may look more defined and sculpted, or it can make it look more natural. To make a perfect contour, one needs some makeup tools to help the contour blend evenly on the face. It can be applied with a beauty sponge, contour angle brush, and stippling brush.
Listed below is the complete tutorial from a makeup artist on how to contour.
- Apply Primer and Foundation
- Contour the Forehead
- Contour the Cheekbones and Jawline
- Contour the Nose
- Finish with Highlighter and Bronzer

1. Apply Primer and Foundation
Primer is a pre-makeup cosmetic that can be applied after skincare and before applying foundation. It can help the foundation, and the rest of the makeup stay in place for up to several hours without being greasy and sticky. Different types of primers can be used. Like Moisturizing, matte, blurring, and illuminating primers. It can reduce pores and oily aspects and add a dewy effect to the face. When applying primer, it is better to use fingertips as they are easy to blend, and primer can be absorbed quickly. It can easily hide facial blemishes that require a primer. Lastly, wait for the face to completely absorb the prime before putting the foundation for a smooth makeup finish. The Foundation is used to brighten or balance uneven skin tone. Foundations come in various shades and finishes that can suit all skin types and complexions. There are liquid and cream formulations, and different finishes can be preferable to one's skin type. To start applying foundation, place at least two or three pumps on the back of one’s hand. Make sure it matches the skin tone, and start using applying it on the middle part of the face and into the apple of the cheeks. Lastly, blend with any makeup applicator like a beauty sponge or foundation brush. These makeup tools can provide consistent coverage and leave no streaks on the face. Foundation tools can offer a natural look or a full coverage foundation.
2. Contour Your Forehead
Contours can emphasise or make the shape of the face different. It creates the illusion of highlighting facial features and making most of the face look smaller. It can be a liquid, cream, or contour stick. Contouring the face may depend on the type of shape ones have. The face shape is round, oval, heart, and square. These are the face shapes that need to be considered, and here are some tips on how to outline the forehead with different types of face shapes. If it's oval, apply a contour along the hairline to flatten the forehead and make it look smaller. The heart shape outlines between the sides of the forehead and the temples can be rebalanced to the size of the upper half of the face. Apply it to a round face on one's forehead and temples to make it look smaller, the same as with a square face. To get a more natural illusion, the contours of the forehead should be at least two times dark as the skin colour. Use an angle brush or contour brush to make the contour look more accurate and natural.
3. Contour Your Cheekbones and Jaw
Contouring the cheekbones and jawline is probably the same as contouring the forehead. It depends more on the outline of the face or can be more detailed and defined depending on the type of makeup one wants to achieve. Cheekbone and Jawline contouring can create the illusion of a smaller jawline while making the apple cheeks appear more defined and highlighted. Use any contour cosmetics that match the skin complexion, apply contour to the upper part of the cheeks, and blend it until one can see the look one wants. Then glide it onto the jawline until the contour makeup looks like a natural or more minor illusion. The shape gives a perfect appearance if the contour residue brushes appropriately. It can use an angled or pointed brush to make the contour more set out.
4. Contour Your Nose (Optional)
Nose contour is one of those things that can complement makeup. It can make the nose appear smaller, thinner, longer, or more pointed. This sculpting technique may be optional for those who are satisfied with the shape of their nose. At the same time, some still apply the outline to enhance the nose’s appearance further. The product that can be used to contour the nose is a cream, contour stick, or powder one to two shades darker, depending on the intensity of the contouring one needs. This can create the illusion of making the nose look more attractive. Using the nose contour brush, dip the contour product to make two lines downward on each side of the nose, then create a thin outline on the tip of the nose. Draw a straightforward design first, which is much easier than erasing the excess. Blend it using the nose contour brush until it leaves a thin layer of shadow, making it look more natural. This nose contouring technique makes the nose look sharper and slimmer.
5. Finish with Highlighter & Bronzer
To create the final makeup on one face, set it with a bronzer and highlighter. The bronzer can be used too for contouring that requires one to two times darker skin tone. It can be used as a setting powder to contour the face to make a natural sculpted face shape. The highlighter is used on the high points of the face. It can create dimension with a radiant shine effect on the face and give the face a natural glow and precision. The highlighter can be a liquid or powder texture in shades of yellow, pink, and gold. This colour shade will likely depend on the makeup one wants to achieve. Applying a highlighter is the last step in makeup. It can be applied after defining the contour with bronzer, then applying a highlighter on the face to brighten up. It can be used with a fan brush for powdery and liquid textures. Blend well, so it won’t settle on the face that may appear on is using a shimmery eyeshadow. Bronzer and highlighter can help make makeup look gorgeously stunning.
What are the tips for choosing the right contour shade for your skin tone?
There are a lot of colour shade palettes that cosmetic brands make, especially for contouring. It can be cream or powder texture and enhance one to apply makeup in the safest style of doing it. Choosing the correct contour hues suitable for one skin complexion can be overwhelming. There are a lot of cosmetic brands that produce their contour palette or stick with different finishes and shades. Here is the best way how to choose the right contour colour on skin tone. Find a product two shades darker than the foundation, and always be mindful to know shades suitable for one skin undertone. It may look like a shadow or more like a naturally sculpted face. If using the cream contour, set it out with a powder bronzer that can be the same shade of the contour that one's applied to, and remove the residue of the cream contour. When using powder contour, make sure it blends evenly to create a natural contour shadow.
What are the common mistakes of applying contour?
Contouring is one of the most notable makeup styles since it creates contrast on the face. It makes the profile of the face highlighted and shaped. Contouring can’t be easy as it looks. Sometimes, applying contour can be challenging and still requires practice to do it perfectly.
Listed below are the guidelines for the biggest mistake you make when contouring.
What is the best brand of contour?
There are a lot of cosmetic brands that release their contour stick or palette that has different kinds of shades and finishes like cream, powder, and liquid contour makeup. It's likely to depend on how intense, defined, and sculpted one wants to achieve. Here are the makeup brands and their contour makeup line that can help one achieve a defined and sculpted cheek and jawline.
Listed below are the brand's best contour makeup products:
- Smashbox The Cali Contour: Smashbox is one of the brands that was the first to release a contour palette. It has an overall rating of 4.6 out of 5-stars, mainly because it has the perfect shade that can be ideal for light to medium skin complexion. The average price of Smashbox The Cali Contour is £30 GBP. The palette has six colour shades with different usages, such as highlighter, bronzer, and blush powder texture with a high pigmented form.
- MAC Studio Fix Sculpt and Shape Contour Palette: The MAC makeup brands are known as they can provide good quality makeup products. It releases a contour palette that is specifically made for darker skin complexion. It has an overall rating of 4.9 out of 5-stars, mainly because it has six high-intense colour pigments with matte and shimmery texture. The average price of MAC Studio Fix Sculpt and Shape Contour Palette is £36 GBP. It has three contour colour shades and three highlighters ideal for any skin complexion.
- Charlotte Tilbury The Hollywood Contour Duo: The brand that formulates a contour makeup line with a sponge wand applicator. It has an overall rating of 4.4 out of 5-stars, mainly because of its easy-to-use sponge applicator that can produce the contour product evenly. The average price of The Hollywood Contour Duo is £52 GBP. It has two different kinds of colour shades that are suitable for warm and cool skin complexion.
Is it better to contour using cream or powder?
Cream contour is better if one’s needs a natural-looking precise, sculpted face, and Powder contour is better when one’s needs a more intensifying appearance. Cream and Powder Contour are both better when applying an outline to the face. Since they do the same thing, they both can add depth and dimension to the face. It's likely more depends on how intense or subtle makeup one achieves. The cream can be used if one wants to look more natural contoured face since it's a cream base. It is easy to blend and set with a bronzer to look like a more natural, defined shape. The powder contour can provide an intense matte finish, with a staying power and fully sculpted face shapes. That's why they are both better for use when defining the face.
